Today’s post is the start of my Christmas holiday cardmaking! I’m still doing Fall as well so they’ll be a mix of both seasons on the blog. I do love both Fall/Thanksgiving and Christmas. If you are wondering about Halloween, I don’t celebrate that holiday so you won’t see anything here for that.
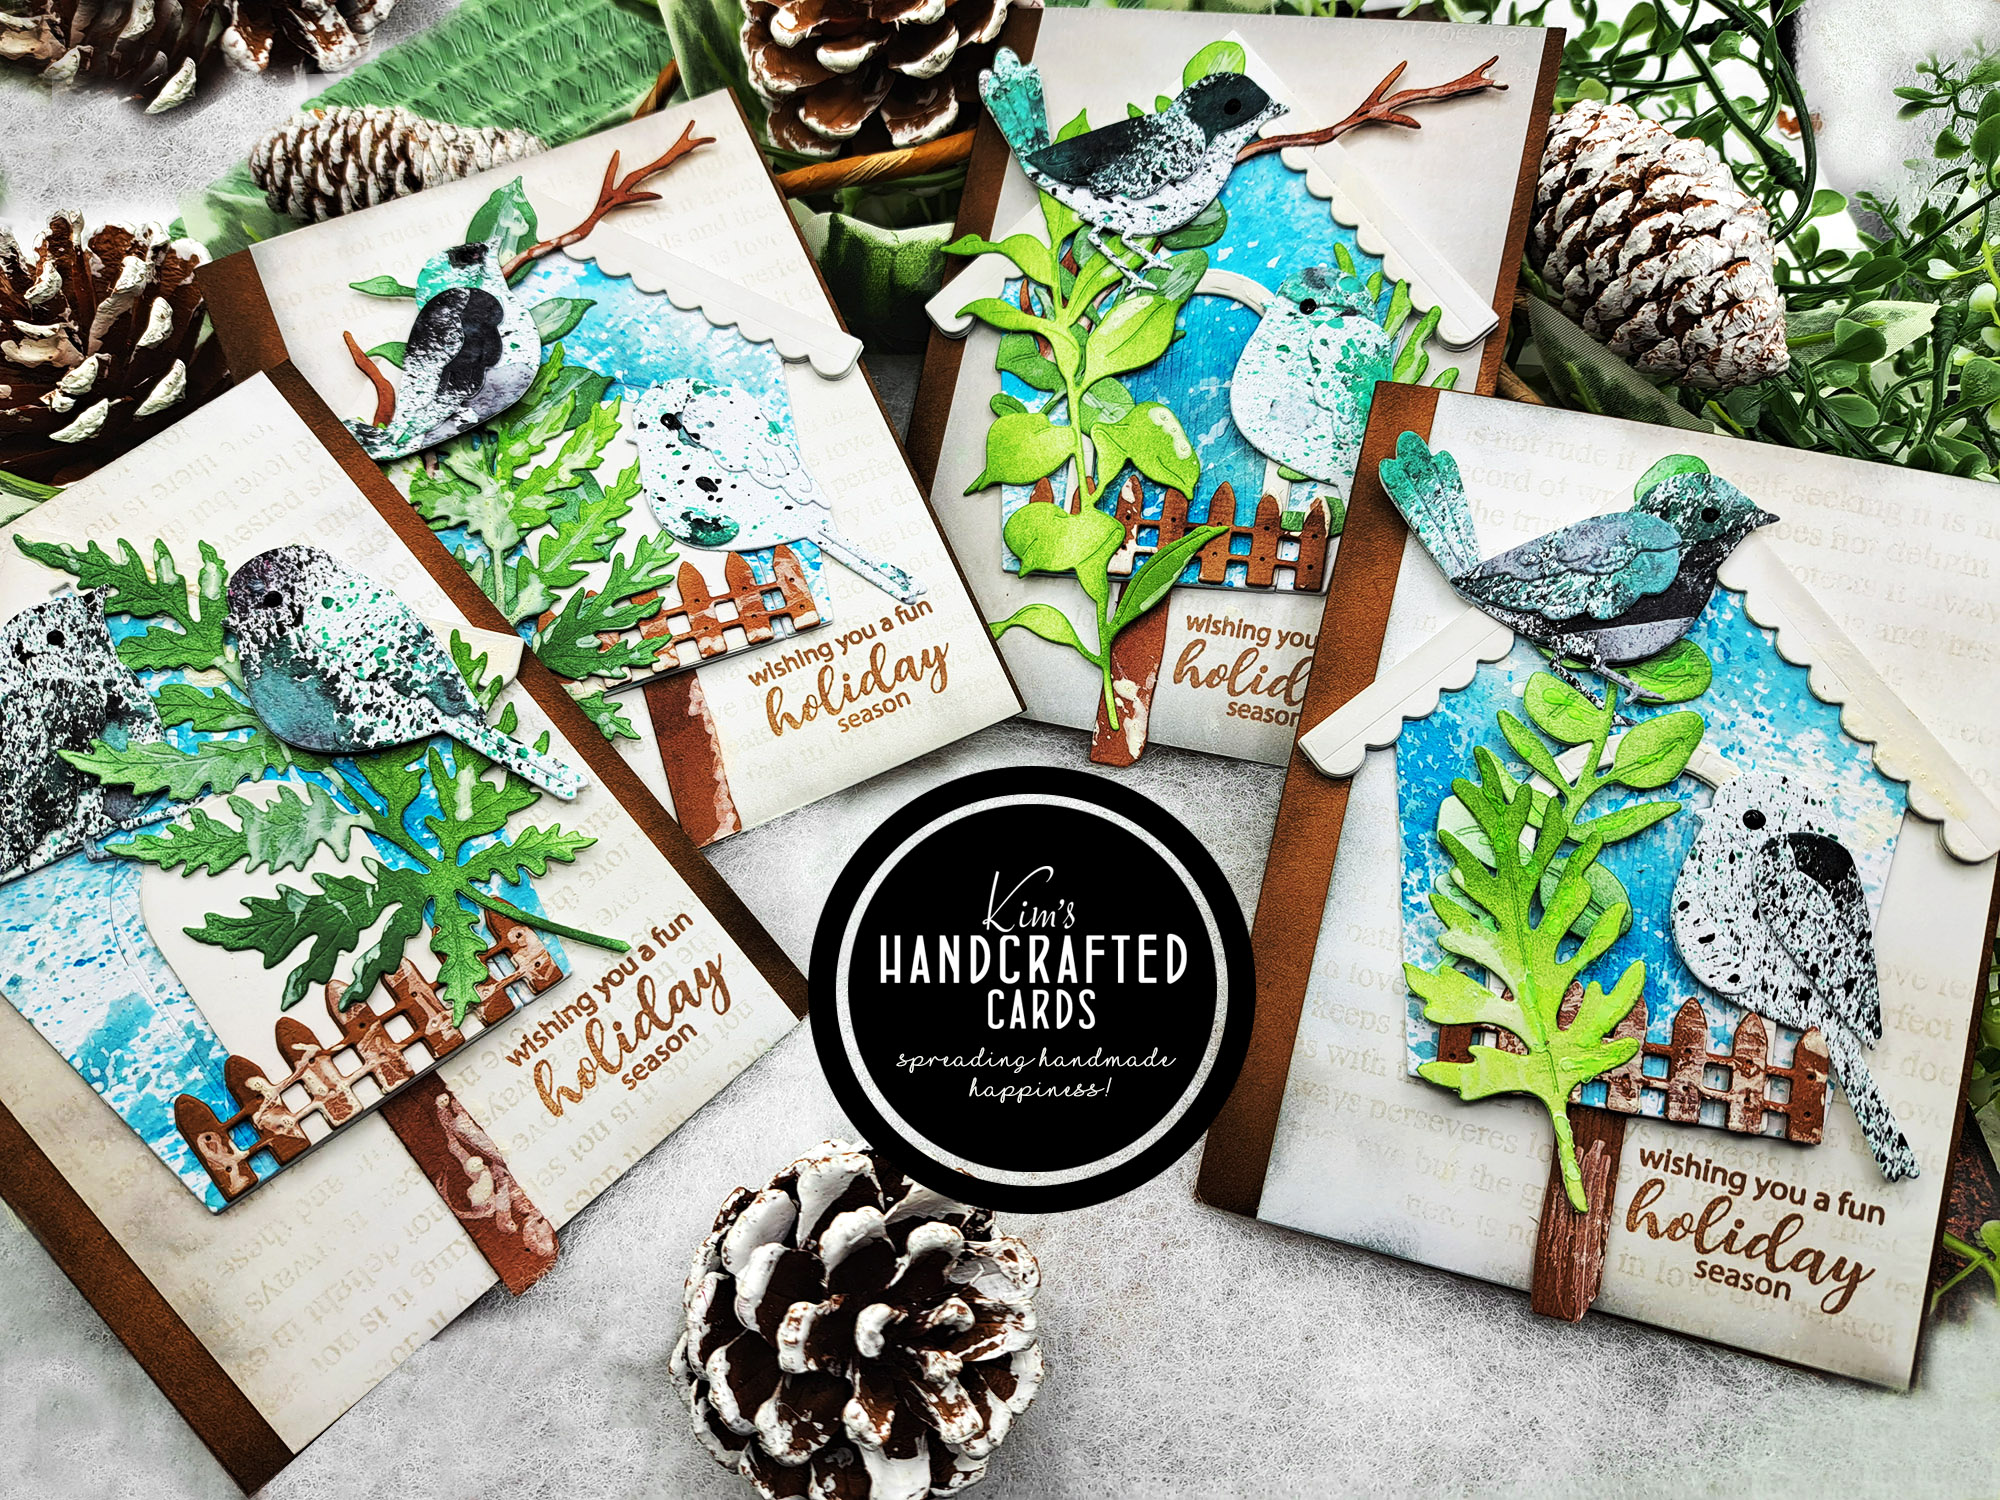
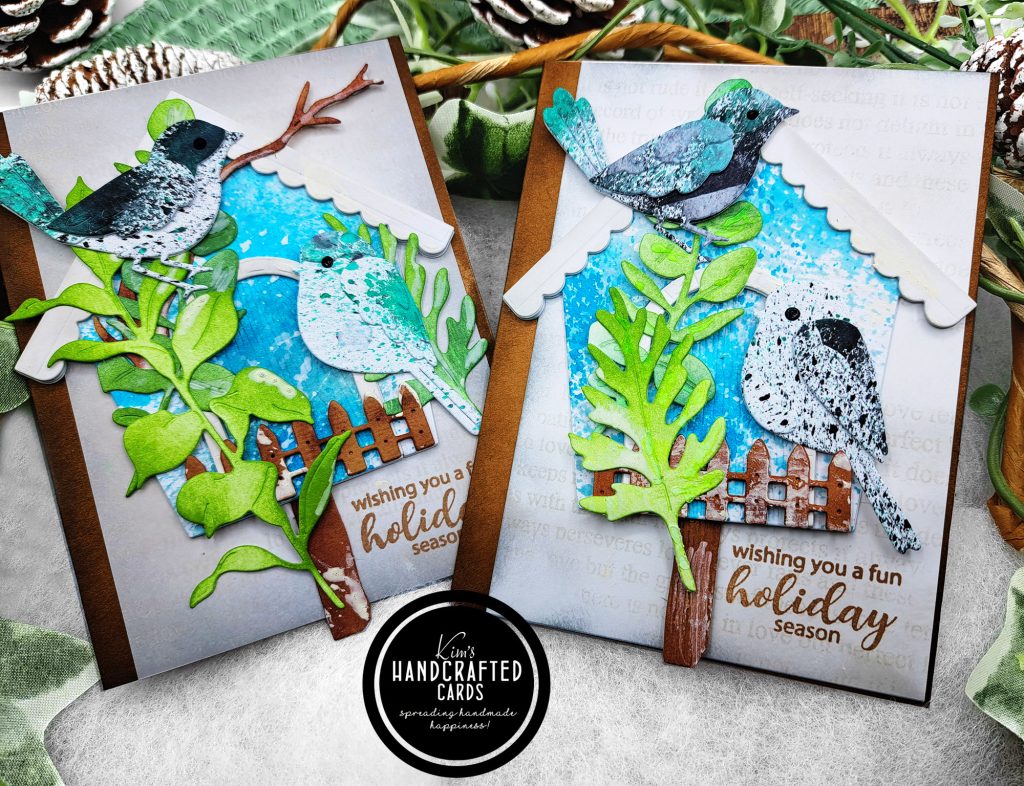
Let’s get into these 4 cards today, because they were a labor of love! It took me over the course of 7 days it took me to finish. I used many products and lots of techniques and typically I don’t spend this much time on making a card. Also, my day job work schedule was crazy this past week.
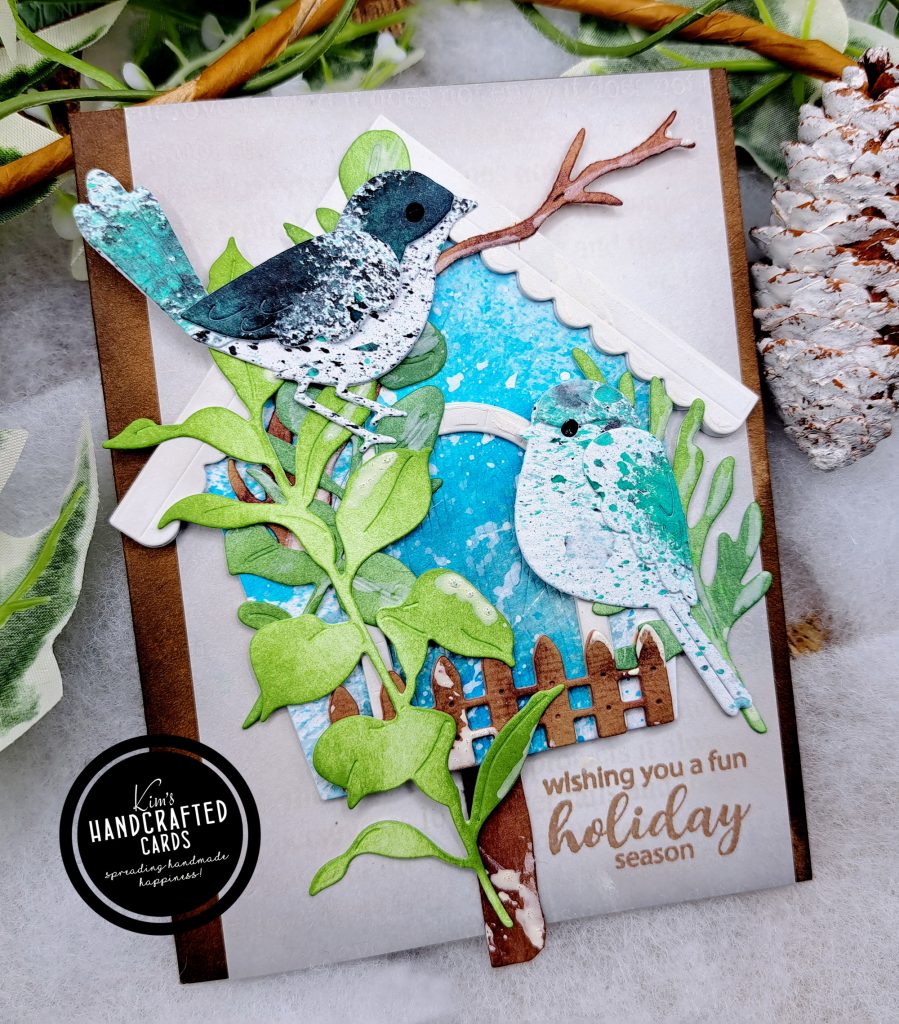
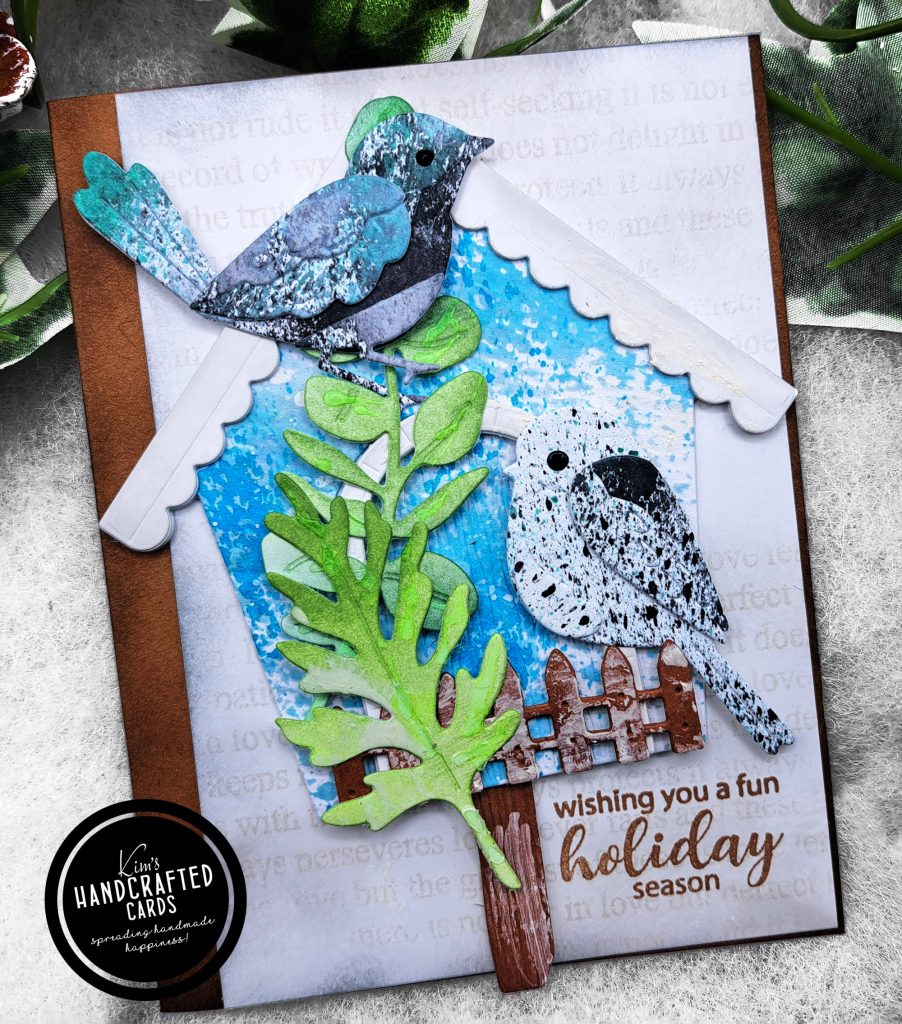
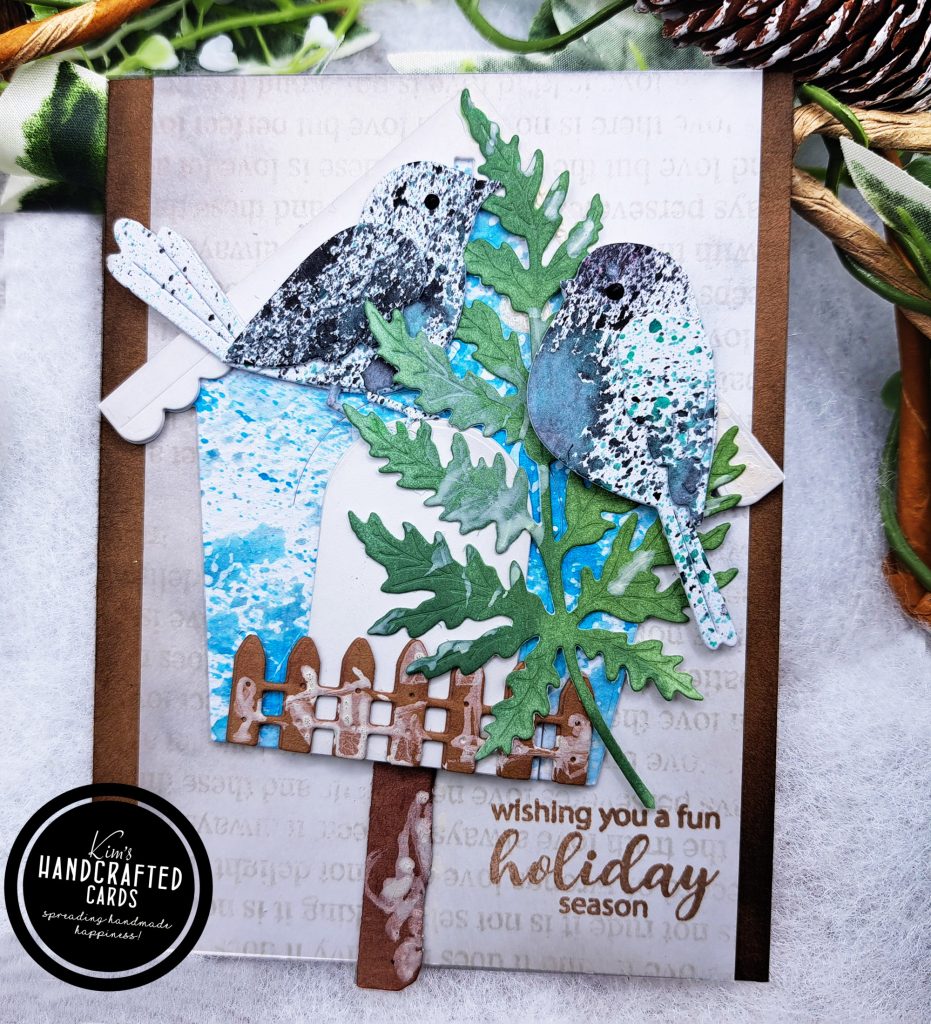
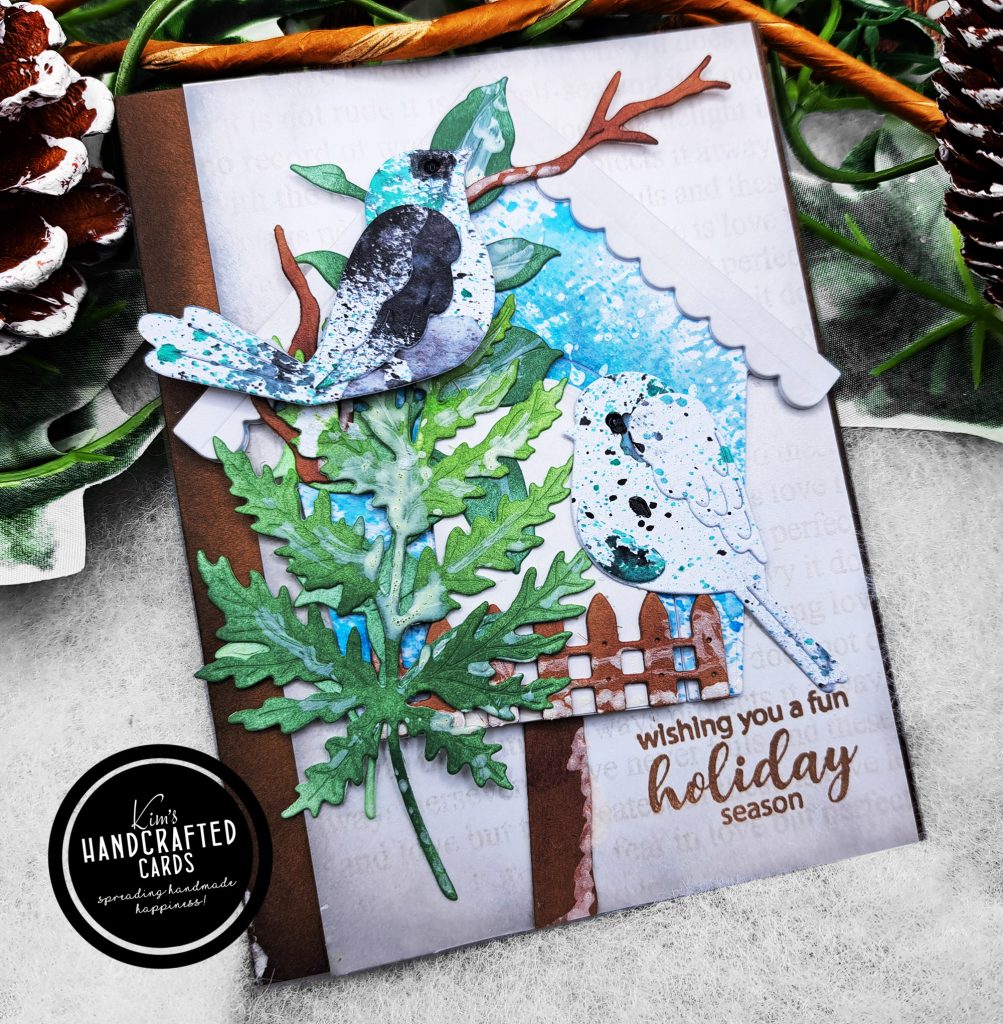
To complete this project, I worked in parts so the first thing I did was die cut my birdhouses on white cardstock and for that I used Honey Bee Stamps Birdhouse A2 Cardbase Builder Die set that I have used so many times but it’s really because I just adore this set. Today, I only used the lower birdhouse from the set but I’ve used both the lower and upper parts to make shaped easel cards in this post.

For the Birdhouses
I wanted a watercolor look so I die cut the birdhouses on Tim Holtz Watercolor Distress Paper. Then, I sprayed all my houses with Distress Spray Stains in Salvaged Patina and Speckled Egg. I let that dry and then splattered them with Distress Picked Fence paint. I set all 4 birdhouses aside and worked on the birds.
For the Birds
So for the birds, I also sprayed them with the Spray Stains in the same colors but added Cracked Pistaschio. I let them dry adding splatters with Black Soot. These birds are from Simon too.
For the bird’s eyes, I initially cut a small piece of black cardstock and glued that on the back covering the eye, but it didn’t show through well from the front with all the coloring so instead I used Nuvo Black Drops.
The Greenery
While the birds were drying, it was time to work on the tree branch and foliage. I borrowed the branch from Spellbinders Birdhouse through the Seasons “Sweet Birds on a Branch” die set. I used Honey Bee Stamps Lovely Layers Greenery die set die cutting on regular white cardstock and ink blending with Pinkfresh Studio’s Olive and Evergreen inks. For the branch, I ink blended with Pinkfresh Studio’s Doe and Gathered Twigs.
For the Extras
I wanted something special for these cards so I pulled from my stash Spellbinders Birds for the Seasons (the Spring set). I die cut the fence and a post (from the Summer set) on Kraft cardstock then ink blended them again with Doe and Gathered Twigs. I love these 2 browns mixed together. I also used them for my cardbases which were also made from Kraft cardstock.
Almost forgot to mention that I die cut the birdhouse roof and door/door frames from white cardstock but to add some dimension and texture, I ink blended these pieces with Pinkfresh Studio Misty Coast. It gives it an off white rustic-like color.
I wanted to add some snow to my scenes so I broke out my snow marker pen that I hadn’t used in years and added snow to the house, fence, post and of course the greenery. I let everything air dry to work on my card panels.
Card Panels
I didn’t want my design on plain white so first I trimmed some white cardstock to 3-3/4″ x 5.5″ and blended that Misty Coast all around the edges into the centers of the paper. Also, added a little Metropolis ink on the edges. Then stamped on top of it with Simon’s “Love Is” cling background stamp set. I love this set because it repeats the Bible verses from 1 Corinthians 13:4-8. I stamped this with Misty Coast. It blended well and doesn’t compete with the overall design.
The Sentiment
After all my elements were dry, I played for days with placement. These cards have so much dimension and not made to mail in a regular envelope. I knew exactly where I wanted the sentiment to go and that was the bottom right hand corner.
I just purchased Simon’s Pawsitively Saturated Inks Trio #10 which is Latte, Cappucino and Mocha so I stamped the sentiment with Cappucino. And the sentiment comes from Spellbinders Tweet Sentiments Stamp set.
Finally, Putting it all Together
The card panels were glued on first, then the birdhouses. I already glued the fence and post on the houses before adding to the card panels. Also, I adhered the houses at different angles for added interest.
Then, I worked in the greenery and the tree branches on 2 of the cards using liquid glue and sometimes tiny strips of foam tape. I nestled my birds in there too, so much fun! My cards are done!
I really stretched myself with this project and I’m so happy how it turned out!
You’ll see each card is just a little different and I like doing that when mass producing cards. Even just placing elements in different positions helps the project not be boring! Thanks for reading!

Some of the links to the products I used are affiliate links which means that when you shop with them, I’ll receive a small commission at no extra cost to you. Your support helps me run my small crafty business. Thank you so much!
- Honey Bee Stamps Bird house A2 Card Base
- Spellbinders Birds through the Seasons (Sweet Birds on a Branch) die set here or here
- Spellbinders Birds through the Seasons (Spring) die set
- Spellbinders Birds through the Seasons (Summer) die set here or here
- Simon Says Stamp “Layered Chick-a-dee” Die
- Simon Says Stamp “Layered Birdie” Die
- Simon Says Stamp “Love Is” Cling Stamp set
- Spellbinders “Tweet Sentiments” stamp set
- Distress Spray Stains
- Stamp Positioner: Misti here, here, here or here
- Pinkfresh Studio Inks
- Simon Says Stamp Pawsitively Saturated Ink TRIO 10 ssk310
- Blending Brushes, large size here, tiny size here
- Spellbinders Platinum 6 Die Cutting/Embossing Machine here or here
- Stamp Positioner: Misti here, here, here or here
- Accents 100 lb. White Cardstock
- White double-sided foam squares
- Kraft Cardstock
- Bearly Art Glue
- Glassboard Craft Mat → Use my Code → KIMCARDS20 at checkout
- Craft Reverse Tweezers by EK Tools (great for picking up die cut pieces)
- Snow Marker Pen
- Black Nuvo Crystal Drops