Hey my friends, it’s been really busy the last week with my day job so I hadn’t had much chance to craft. Finally, yesterday I had a bit of time so I took advantage of it!
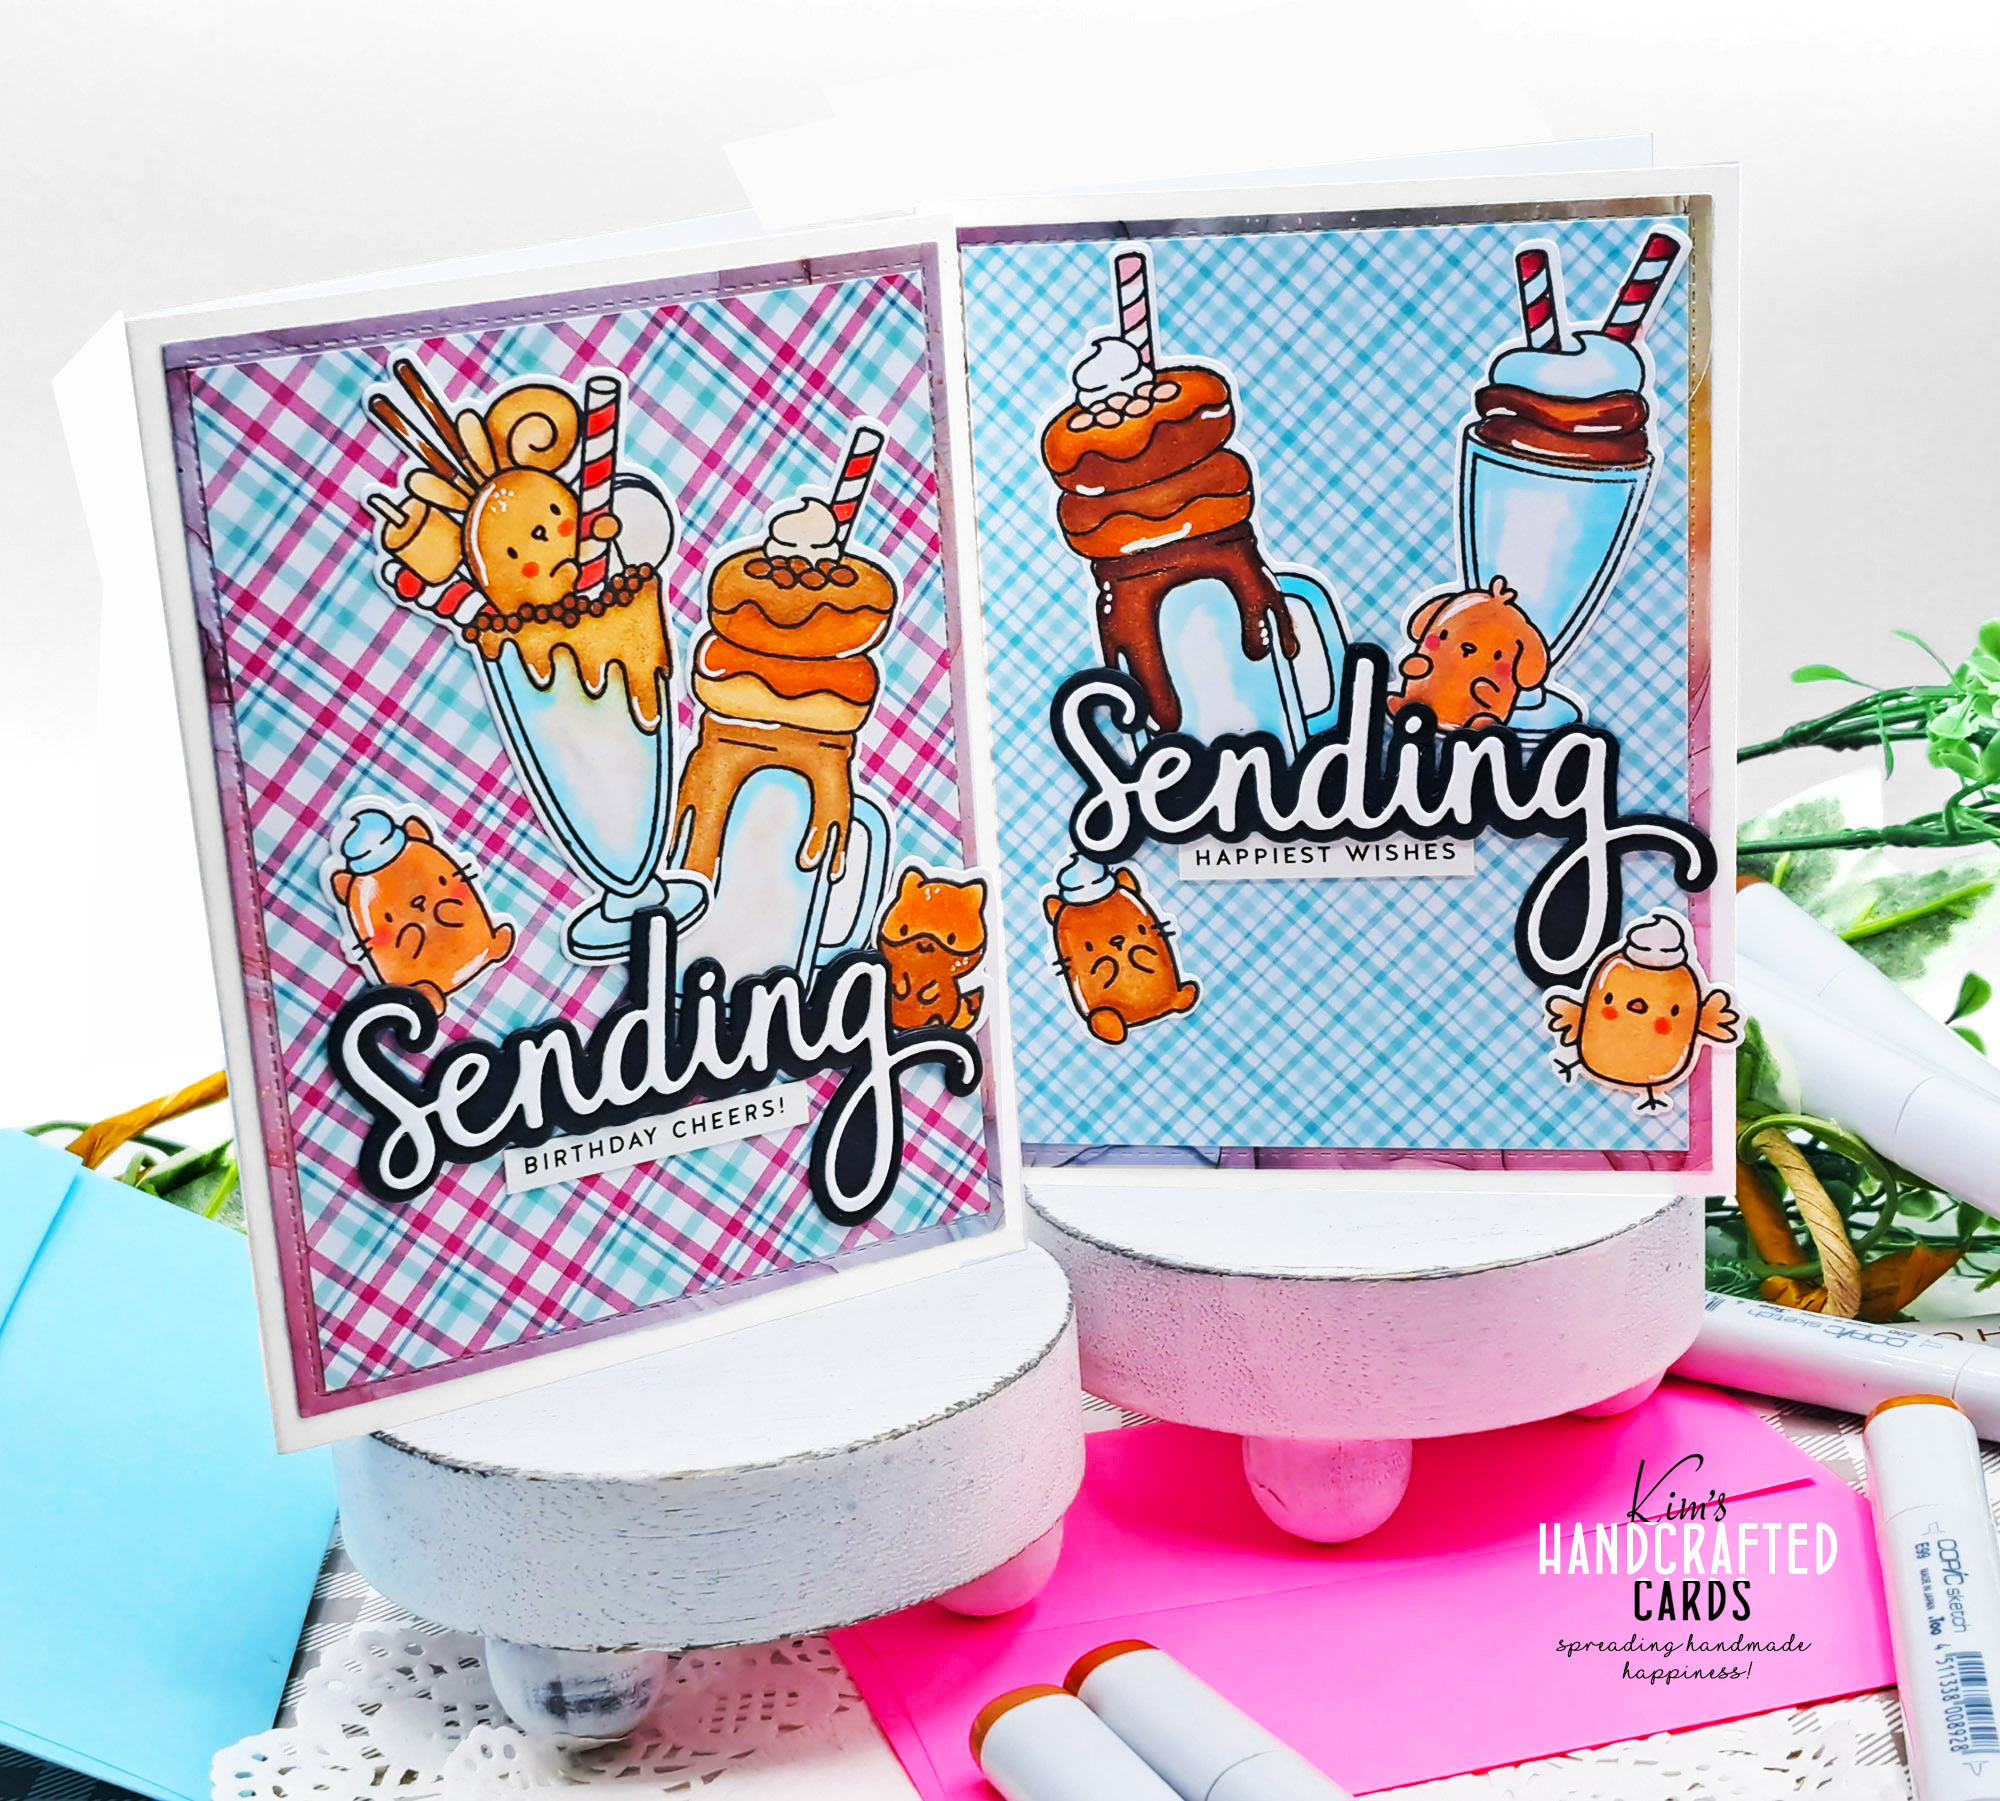
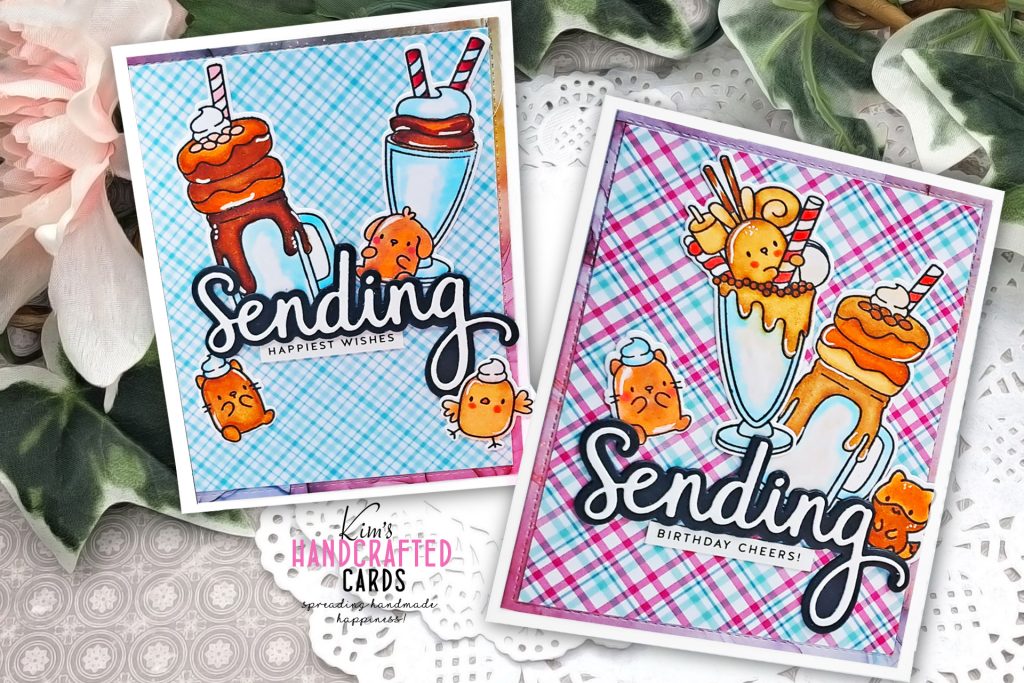
I felt like doing some Copic coloring and who doesn’t love critters on birthday cards?, I’m not very good at coloring florals but I love to color little die cuts for this I used Mama Elephant’s Milkshake stamp and die set. I’ve used this before in this post and it is so cute. I love how my coloring looks on these cards.
I made 2 cards plus a bonus card to share with you today, let’s get to it!
Colors Combos Used
I’ll start with the Copic coloring which I’ve broken out in sections in case you’re interested in what I used:
Milkshakes
- E33, E30 & E00
- E35, E37 (darkest color)
- E97 & E99
Bears
- E33, E30
- E97, E99
Cheeks
- R14
Mugs
- B000, B00 & E40
- Straws – E40, R14
Other Colors
- 0 Colorless blender (I depend on this) 😀
For my Bonus Card
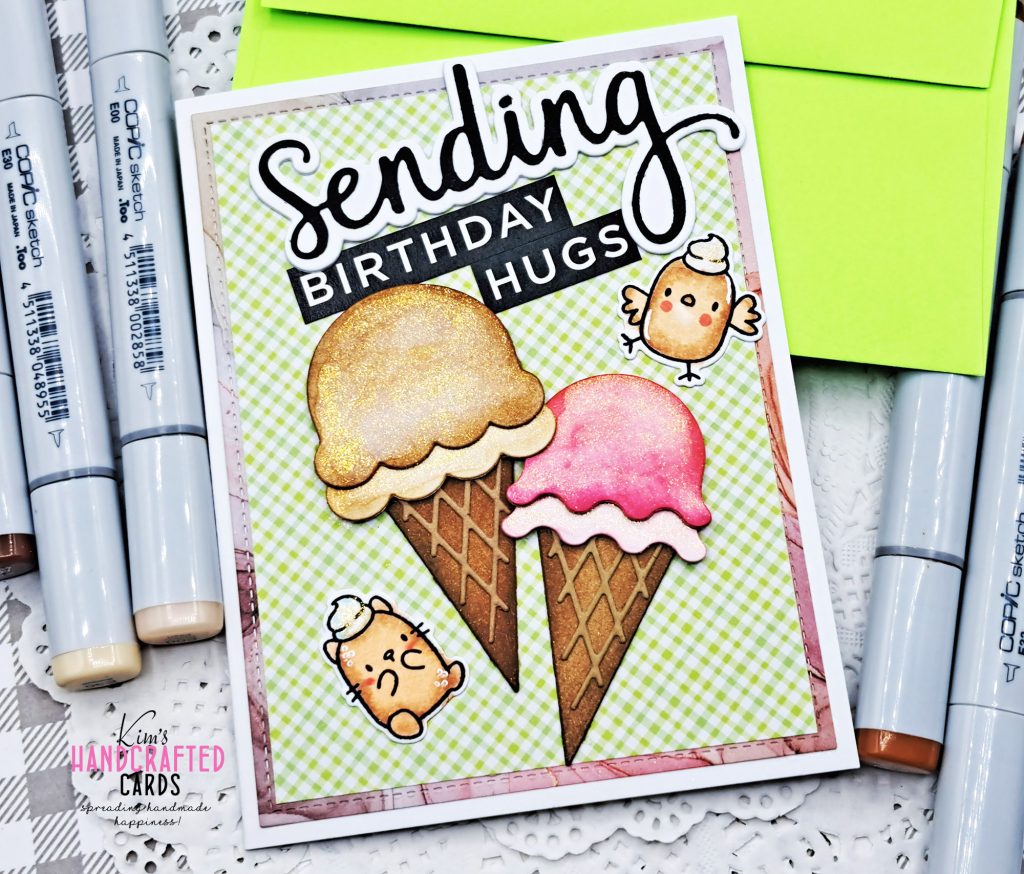
This card is a bit different though it shares a similar card design, I used Scrapbook.com’s “Sweet Scoops” die set as my main focus. I love this die so much that I made a card and matching gift tag. You can see the post here.
These are the colors, I ink blended for the ice cream cone using the inks below:
Cones & Chocolate Ice Cream
- Distress Vintage Photo and Black Soot
Strawberry Ice Cream
- Distress Picked Raspberry and Candied Apple
For extra touches, I added a bit of shading with Nuvo’s Aqua Shimmer Pen. It added a pretty glittery glow with gold undertows. I painted the ice cream, the bears and the milkshakes.
For a final touch, I used my white #10 gelly roll pen to add some accents to the bears and the milkshakes. Under the right lighting, the shine is so pretty.
For the sentiments, I went with Pinkfresh Studio’s “Sending“ word die as my go to and Simon Says Stamp’s sentiment strips for the secondary sentiment.
After all my elements were done, I worked on the cardbases and panels. A few weeks ago, I picked up Craft Consortium’s “Dusk” Ink Droplets pattern paper pack. The alcohol ink patterns are just beautiful.
So, I picked 3 sheets and trimmed them to 4″ x 5-1/4″, then adhered them to my cardbases. For the panels, I went with My Favorite Thing’s “Pretty in Plaid” and “Rainbow Plaid” paper packs and those are trimmed to 3-3/4″ x 5″ and I adhered them.
I played with placement and once I figured that out, I used Press ‘N Seal to keep my pieces together and glued them to my card panels. And that was how easy these cards were made!

Some of the links to the products I used are affiliate links which means that when you shop with them, I’ll receive a small commission at no extra cost to you. Your support helps me run my small crafty business. Thank you so much!
- Mama Elephant “Milkshake” Stamp set, Coordinating die set here
- Scrapbook.com “Sweet Scoops” die set
- Craft Consortium “Dusk” ink droplets pattern paper pack
- My Favorite Things “Pretty in Plaid” Pattern paper pack
- My Favorite things “Rainbow Plaid Pattern paper pack
- Pinkfresh Studio “Sending”Phrase Builder die set
- Simon Says Stamp & CZ Design sentiment strips collection
- Accents 100 lb. White Cardstock
- Distress Traditional Inks or browse all the Distress lnks here
- Blending Brushes, large size here, tiny size here
- Copic Sketch Markers here, here or here
- Spellbinders Platinum 6 Die Cutting/Embossing Machine here or here
- Spellbinders Universal Plate System – here, here or here
- Bearly Art Glue
- Glassboard Craft Mat → Use my Code → KIMCARDS20 at checkout
- Glad Press ‘N Seal (3-pack)
- White #10 Gelly Roll Pen
- Nuvo Aqua Shimmer Pen-Midas Touch
- Craft Reverse Tweezers by EK Tools (great for picking up die cut pieces)
- Paper Trimmer: Tim Holtz here (Ranger), here (Scrapbook.com) or here (AZ)
- Mini White Wood Risers (2-pack) – AZ